12/14/14 update:
Okay, so an update to this blog. A year after doing the portlights I can’t 100% recommend the butyl tape. Why? Because the repeated tightening down of the portlights causes the butyl tape to leak/ooze/squish out. Also, the positive aspect of it being malleable and slightly tacky(no, not in a polka dot with stripes kind of way) is a con in this application since it collects dust, whenever you touch it, it gets squished down, and it just doesn’t look super polished.
So, I think if I ever have to do this again I would try the Skkaflex but I would let it dry before cleaning off the excess. The reason it’s so hard to work with is, it is gross cleaning up the excess; plus you go through a crazy amount of paper towels working with the stuff. Better off to let it dry, then just cut off/away the excess.
Anyway, I’m still happy with how the portlights look and function, but live and learn.
Happy projects!
Happy Saturday crew! Let me tell you the tale of the portlights. Get comfy because this is a long one.
As you have already surmised, Serenity is a more, er, mature sailboat. With that comes the ARGGGG factor – like sink faucets that only dribble water – to awesomeness like bronze portlights. Bronze portlights are rarely put in sailboats anymore, the trend being stainless. I’m a big fan of stainless but these portlights fit the ambiance of Serenity and I really wanted to give them some TLC to bring them back to the superstars they are.
More than just making the portlights pretty we needed to replace the old and crumbly gaskets = leaks, and the laminated safety glass. The glue had started to deteriorate making the glass look grubby.
We contacted Gulf Coast Auto Glass here in Bradenton and for $16 a piece they cut us 9 pieces of glass. We also searched out gasket material. Lemme tell you, that was a challenge. The gasket channel is 5/16″ wide x 1/4″ deep and that’s not really something you can run to Home Depot and grab a roll. I thought, O-ring material would be a good choice. I only bought 10 feet, enough for 3 portlights because I wasn’t sure how much of a pain it would be to install. Round material in square channel. Not the best idea, but it was a starting point. (We wound up finding 5/16″ x 1/4″ neoprene gasket which we ordered by the foot. It worked a LOT better. No cutting down required.)
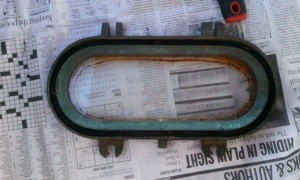
Here’s a pic of what I was dealing with, grunge wise. This one was the worst off as far as munge than some of the others, but ironically it cleaned up the best. I started with the portlight in the shower stall figuring if I screwed it up and it leaked than the damage was contained to an area designed to get wet.
There was no way I was going to pull the body of the portlight out in order to clean it. Re-bedding the portlights was NOT on the agenda. Not this go round anyway. So, how does one clean a vertical object with liquid, of which is subject to gravity = running down the sides? After some cyber-skulking on various boat blogs, websites, etc… I landed on vinegar as the cleaning agent. Cheap and non-toxic. Bonus. I made up a paste of flour, salt and vinegar. I slathered it all over the portlight and skipped away to tackle the glass removal.
Let me tell you, the caulking they used to bed the glass is naaaasssssty! Tim loathingly refers to it as Tayana Black. As in, the Black Hole of Sticky, Get Everywhere Goo. Via 2 bolts I removed the portlight body from Serenity. The bolts and dogs were put into to a bath of vinegar to soak. Using our trusty 5in1 tool I scraped out the gasket material from the channel. Of course it crumbles all over the place, leaving me with not only a gooey mess but crusty gasket boogers to boot. I quickly learn stay out of the wind lest the crumbly crap fly everywhere. Old gasket out, I unscrew the 4 small screws for the retaining ring. Easy peezy.

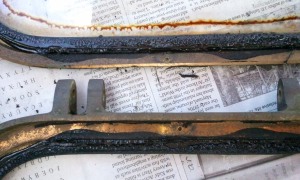
Portlight minus gasket, ready for old glass removal. The brown stuff? That’s the glue from the laminated glass.
Freeing the glass from the body was pretty easy. Scrape away some gasket material, wedge the 5in1 tool in between the body and glass, gently pry the glass away. In a couple minutes I now had the glass out of the body, however it was still affixed to the retaining ring. Liberating the glass from the retaining ring would prove trickier.
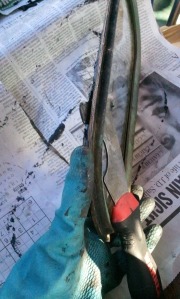
My first couple of attempts in retaining ring glass removal resulted in the glass cracking, which resulted in smaller pieces of (pointy!) glass loitering about. One good side to the gasket material being so gooey is the pointy pieces of glass could not escape the embrace of the goo and go cause mayhem. Slicing of the dermis is very, very low on my list of things I want to happen. And by low I mean never. Also, my anal retentive self wanted one piece of intact glass, not some cracked, busted up shit. I quickly learned using the pointy end of the tool to pry resulted in cracked glass. Using the flat part of the tool and slow and steady got the job done easier and faster. By sliding the tool all the way around the ring and gently prying, the ring and glass parted ways. The glass was freed from the ring in one piece – hooray! Here are a couple of pics of me doing it right.
Using the 5in1 tool I scraped away the Tayana Black Goo. The key was to work in small areas, wiping the tool frequently. It wasn’t the big blobs of gasket and goo that got me, it was the sneaky little pieces that smeared. Being diligent and frequent wiping of the tool was key. Once I had scraped off as much goo as my patience would allow I turned to chemicals. Acetone and green Scotch-Brite and LOTS of elbow grease. It pretty much went: Acetone. Scrape scrape. Acetone acetone. Scrape. Acetone. Scrape. Acetone. Repeat repeat repeat repeat. Finally, the body and ring were gasket and goo free(well, as much as they could be after 25 years). A quick rinse with water and wipe down and time for cleaning.
Let me take a mo and tell you that cleaning the body AFTER goo removal is key. After 5 portlights I realized, hey, there is goo getting on your newly cleaned portlight. If you clean AFTER goo removal that is much more sensible. Live and learn.
Let’s go back to the vinegar and paste that have been stewing on the portlight. Great. It is hard as a rock. I squirt with water. No help. I squirt with vinegar. No good. Gotta bust out the Scotch-Brite pad, and talk about scrubbing. This was good in theory, not good in practice. It just dried out too fast in the 80 degree “heat”. Time for Plan A.5. Plan A.5 is now a 2 part program.
First part is to use a liberal application of Brasso, new Scotch-Brite pads frequently and lots of scrubbing. Good shoulder workout! Since bronze is a pretty soft metal hard scrubbing is not advised, but a firm application and making sure to use fresh Scotch-Brites worked wonders. With the first layer of grunge removed it was time for Part 2: Vinegar.
The below not so great pic shows the portlight with the paper towels soaked in vinegar. My dock neighbor Dianna did her portlights the same way, but she used long cotton swabs instead of paper towel. About every 45 minutes I would give the towels a spritzing of vinegar. The key is to keep the towels wet so the vinegar can work it’s magic, plus at least 4 hours soak time.
While the portlight is soaking, the body and retaining ring get the same Brasso then vinegar treatment. These were easier to do since I could handle them while Brasso’ing, then lay them flat, spritz, cover with paper towel, spritz again to soak, then cover with a plastic bag which prolonged the life of the vinegar. Again, at least 4 hours doused in vinegar really cut the grime.
The final step to beautification was getting that final layer of grime off. Spritz with vinegar, scrub with ScotchBrite(swap out frequently so you don’t work so hard), spritzing, ScotchBrite, repeat until grime is vanquished. A triumphant rinse with fresh water and the portlights positively shine.
Wish I had started this whole project with the Brasso/vinegar double punch. I can only guess the Brasso cuts most of the dirt, corrosion, whatever, and the vinegar bats clean up; baseball reference and pun intended. YAY RED SOX!
On the home stretch now! Let’s button these bad boys up. The first portlight we did we used Sikkaflex (caulk specific to use with glass), however talk about a mess!!! We spent more time wiping up Sikkaflex than bedding the portlight. Another solution was needed. After more cyber-skulking we came across a website where a couple talks about using Butyl tape to bed the exterior part of their portlights. Well, if they could use it for that let’s try it with the glass. People, I am now a huge fan of butyl tape. It has lots of applications, is easy to use, doesn’t stink, can be handled without gloves, and the slight film it left on the glass is easily removed with, you guessed it, vinegar. I applied the butyl tape to the body, set in the glass, then pressed and pressed and pressed to get a good seal.
Butyl tape on the retaining ring, and more pressing. Back in went the 4 little screws, then used a sharp razor blade to cut away the extra tape. A wipe or two to get rid of finger prints and butyl tape film and the portlight has new glass and is sparking clean – HAPPY DAYS!
The final easy step was the neoprene gasket. I measured it by placing it in the channel, cut to length, some contact cement on both parts, then carefully inserted the gasket into the channel. More pressing to seat it, then I installed it back on the boat. I cinched down the portlight so the gasket could get even, firm pressure for the contact cement to really work.
Here is the finished product.
We had a pretty good rainstorm this morning and not one portlight leaked. Whew. On top of this project being good for Serenity it really made the interior look special. Function AND beauty.
For their help I would like to thank: The couple gallons of vinegar, the couple rolls of paper towels, Brasso, butyl tape, 5in1 tool, countless hard working ScotchBrites, knife with sharp razor blade, flat bladed screwdriver, clamp, Acetone.
Hope everyone has a great weekend, and thanks for reading!


Recent Comments